


How To Properly Create Storyboards That Portray A User’s Experience With Your Product
After reading this article, you will have a better understanding of the definition of a storyboard, the different types that exist, and when to use which. I will also provide you with examples of one of my current projects to help you get started with yours as part of the ideation process. Plus, to make your life even easier, I will also refer you to a FREE storyboard template created by the Nielsen Norman Group you can simply download and utilize. Ready to get started?
What is a storyboard?
In UX design, a storyboard portrays a part of the user’s journey; it’s a series of frames that visually depicts and investigates a user’s experience with a product. Recounting to a story through visuals is regularly more successful than utilizing words. According to the saying, a picture is worth a thousand words, storyboarding is a proficient method in establishing a common understanding for all the team members through visual storytelling.
Keep in mind that a storyboard only describes a fragment of the journey. Therefore, you should only refer to the most relevant parts of a user’s interaction with a product. Further, storyboards are a great way to get your creative flow started. They are often considered to be a form of ideation where you brainstorm and sketch out your initial ideas. Storyboards are likely to be the subject of change once you keep integrating more and more real user data. Thus, you shouldn’t look at storyboards as a lasting artifact. Every storyboard should entail the following four key components:
- Character → Refers to the user who plays the main role in the story.
- Scene → Refers to the user’s environment in the story.
- Plot → Refers to the solution or benefit that the product brings.
- Narrative → Refers to the user’s initial problem and how it will be addressed through the designed solution.
What types of storyboards exist?
There are two main types of storyboards used in UX design. Both of them entail the above identified key elements.
1. Big picture storyboard
Big picture storyboards place their focus on the actual user needs and describe why the product will be relevant to the user. Normally, they are used in the early phase of the design process to tell the problem from a user perspective and to convince stakeholders of the idea and its potential.
2. Close-up storyboard
On the contrary, close-up storyboards place their emphasis on the product and its functionalities. The user is less in focus. Hence, this type of storyboard is often used later on in the design process when things get more specific.
How to create a storyboard?
In the following few paragraphs, I will show you how you create both storyboard versions using a realistic example. More precisely, it’s a use case from a current project I am working on. So imagine this scenario: You are designing a mobile app for an art gallery that allows users to create digital art collections and have them available on the go. A user that might download and use your app is an art enthusiast. Let’s give the user a name. How about Givens? Okay great, Givens, it is.
Let’s get started…
Big Picture Storyboard
1. Start with defining your problem statement. This will help you to better understand your user’s needs and to create a character along with a scene for your storyboard. For our example, the problem statement could be this:
Givens is a Creative Production Manager who needs a way to digitally save her favorite artworks from the exhibition because this way she has everything available on the go and can easily share the art with her friends.
2. Come up with a relevant goal statement. This will help you to determine the story’s plot. Four our example, the goal statement could be :
Our art app will let users create and customize digital art collections which will affect art enthusiasts by allowing them to access their favorite art anytime and anywhere. We will measure effectiveness by tracking the amount of collections created and artwork added to a collection.
3. It’s time to set up the storyboard. You can download and use this free storyboard template provided by the Nielsen and Norman Group. If you don’t have a printer or simply don’t feel like printing it, you can also take it as a reference and simply draw it out on a piece of paper.
4. Start to fill out the template. Write down the relevant scenario at the top to set the narrative for the storyboard. Review the defined problem and goal statement and then turn this into a short one to two-sentence scenario describing the problem the user is facing and your solution that addresses it. So for our example, the scenario could be the following:
An app that allows users to quickly and effortlessly scan and add artworks to their personalized digital collection.
5. Focus on the most relevant parts of the user journey fragment and draw one idea per panel. Normally, you start by drawing a scene that reflects the beginning of the story. Each following screen is then filled with a drawing that pushes the story forward. Because this storyboard focuses on the bigger picture, don’t forget to include how the user uses your product and how the user feels in each panel.
6. Reveal previous or current pain points along the user’s journey. This will help the team to better understand the user’s frustration at what touchpoint in the journey.
7. In the final panel, you should come to a conclusion from the user’s perspective. Describe the goal the user was able to accomplish through your product.
Here’s the completed big picture storyboard for our use case:

Close-up storyboard
In order to create a close-up storyboard, you apply the same four steps in the beginning as you did for the big picture storyboard. Here’s a quick summary of steps 1–4 so you don’t need to scroll back up.
1. Start with defining your problem statement.
2. Come up with a relevant goal statement.
3. It’s time to set up the storyboard. You can download and use this free storyboard template provided by the Nielsen and Norman Group.
4. Start to fill out the template. Write down the relevant scenario at the top to set the narrative for the storyboard.
5. That’s where things are starting to differ. While big picture storyboards focus on the user’s experience with a product, close-up storyboards focus on the product and its unique features. This being said, think about relevant product details you want to pay attention to in each panel and briefly explain why. In this example, you concentrate on the user flow within the product. each panel can represent a relevant screen to fulfill the flow tas from start to finish.
6. The final panel normally marks the end of the flow. In many cases, this is where a user receives a confirmation message or was able to successfully complete a task.
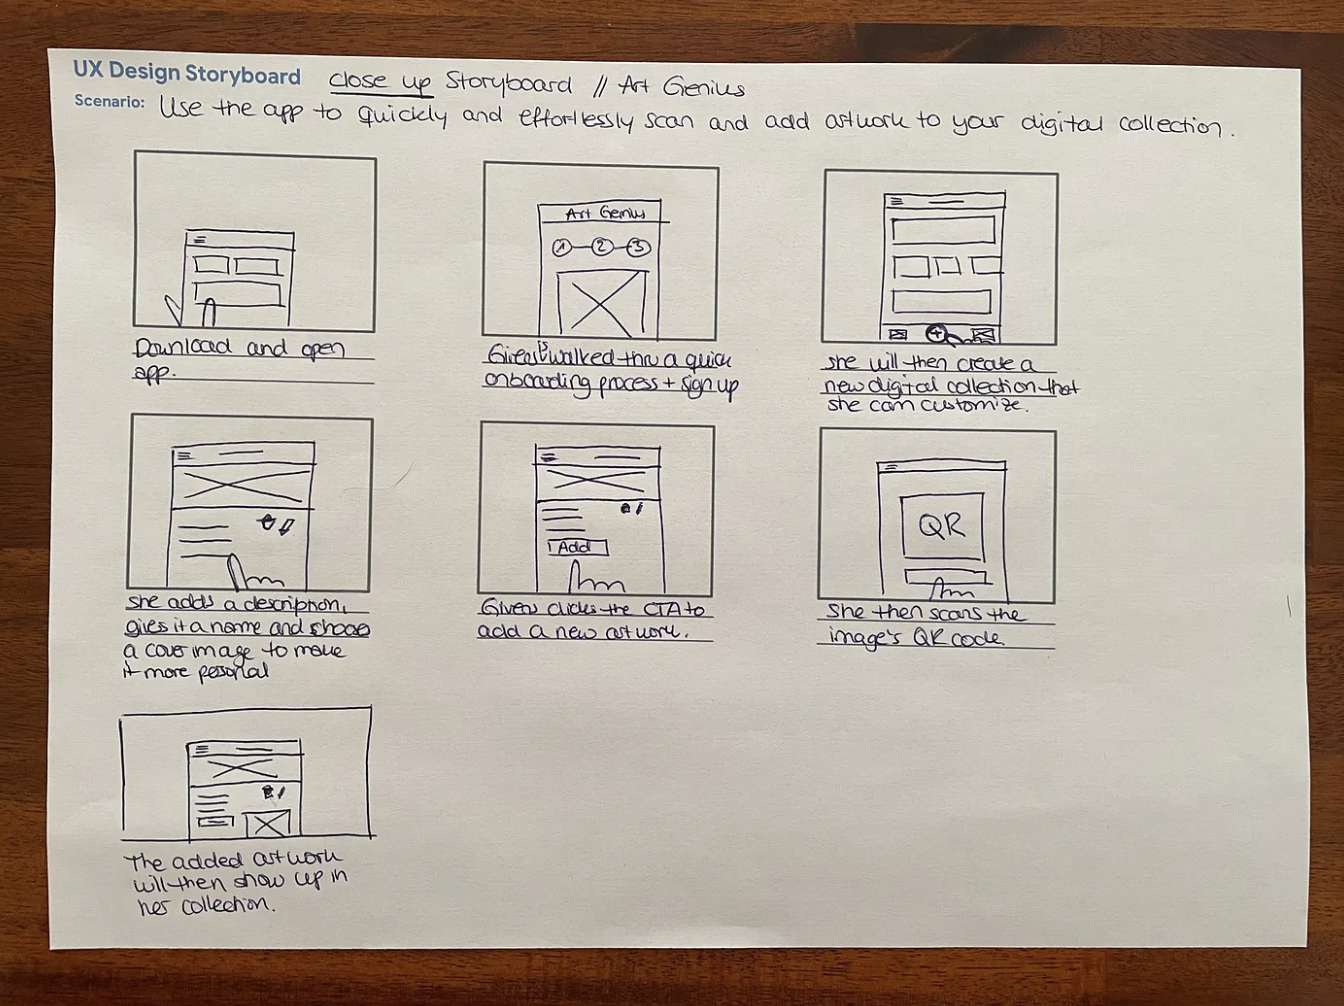
Here’s the completed close-up storyboard for our use case:
And that’s it! You now created your first big picture and close-up storyboard. It wasn’t that hard, was it? As you keep practicing storyboarding, you will become better and faster with it over time. Promise! Have an awesome day and until next time 👋🏻
— Carina


